I use the wonderful Comicbook Database program ComicBase to keep track of my comic collection. I really love the program. I like to scan all my own covers even though the version of the software I use “Archive Edition” comes with a LOT of decent sized scans. Doing my own scans does a couple of things for me. One – it means all the comics pictured in the database that are marked “in stock” are the actual books pictured & Two – it allows me to save at an even higher quality level and at higher resolutions than what ComicBase includes on the DVD sets.
One point of contention that I had when I first got ComicBase is the file format they chose. All the scans in ComicBase are Jpeg files. At first this really bothered me as I had always used PNG format when I scanned covers. Jpeg is usually a “lossy” format (though there is support for lossless in the standard) that is really best suited for photographs rather than line art. Jpeg works best when the image does NOT have hard edges, large blocks of solid color or much text. Jpeg (especially at high compression settings) tends to soften the edges of text or any blocky line art. If the comic cover you are scanning is older & has 256 colors or less in it then the conventional wisdom was to use the GIF format. Only problem was a lot of newer comics from the last 12 years or so have a MUCH richer color palette. Modern comics can have thousands of colors in their printing. If you use GIF for a high color image like that it will be dithered and ugly. So PNG becomes the obvious choice as it has the razor sharp edge quality of GIF but with the HUGE color palette of Jpeg. It’s a win-win….or IS it? No it’s really NOT. PNG file sizes for these complex graphics tend to be rather HUGE. Even with the cost of disk-space getting lower and lower and the size of hard-drives getting bigger and bigger these HUGE files can still become a real problem when one’s comic collection is measured in the thousands! So the solution is to use Jpeg -but use it at low compression rates to ensure high quality and not soften those edges too much.
Before we get into settings lets talk about hardware. To properly scan comicbook covers you need a good flat-bed scanner. I prefer the slimline Canon Scanners. The current models are USB 2.0. They even draw their power from the USB port, so no power cord mess. These scanners are very thin yet can accommodate even big hardcover books thanks to the marvelous expanding “Z-Lid” hinge.
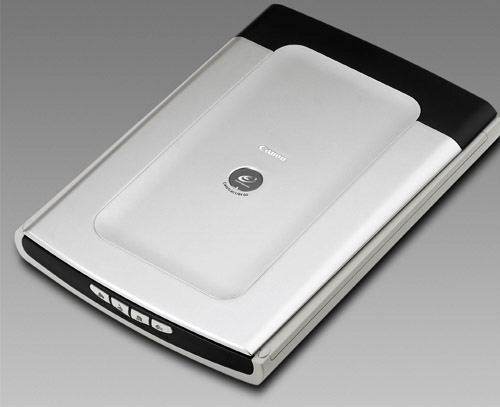
They are also pretty inexpensive. You can buy online or at retail places like Office Depot for $79.99 or less. Unless you also do film negative scanning you really don’t need to spend anymore on a scanner. All recent (I have the LiDE60) Canon flatbeds are fully supported with solid drivers available for Windows XP and Windows Vista. Note -if you have an older PC that lacks USB 2.0 ports it will definitely be worth the 30 bucks to add a USB 2.0 card as the scanning speed difference is VERY noticeable going from 1.1 to 2.0.
This guide will be using screen-shots and settings info for Photoshop CS3. They should match up nicely with most versions of Photoshop and may prove useful for other programs like Corel’s PaintShop Pro though the terms may differ slightly or greatly in some cases.
Start off by cleaning the scanner’s glass. A few specs of dust on the platen will show up on your scan and you don’t want that. I use a combination of anti-static cleaning wipes (also good for LCD screens) and canned air to clean my scanner’s glass. With the surface clean and dry place the comicbook face down on the glass. Be sure to align the cover as straight as you can along the bottom/top and one side. Not many comics are cut/stapled perfectly straight so you will probably have to adjust and “true” the image later with the crop/rotate tools.
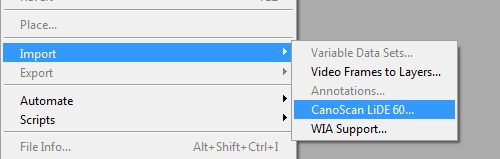
From the file menu choose IMPORT and then select your scanner (of course your scanner won’t show up here until you install the driver):
After that it will scan your preview image and then you will want to switch from the default mode of the scanner driver to the advanced mode so we change some settings:

Make sure auto-tone and unsharp are both OFF. Make sure descreen is ON. Descreen helps to reduce/eliminate moire. Set the DPI output to 300. Set the color mode to Color(Documents). After you scan and close the applet once with these settings selected it should remember them for future use.
Now we are ready to scan for real.

Before we go on I should mention one time saver I employ. When I’m scanning covers I’m typically doing a stack of 20-30 issues at a time. I have a decent (4 gigs) amount of of RAM in my PC. If you have 2 gigs or more you can do this too. I only run the preview scan ONCE for the entire scan session. All the unsaved images are held in RAM in Photoshop while I’m scanning. Just make sure you place the comicbooks in the exact same spot/position on the scanner’s glass each time and you don’t need to keep rerunning the preview scan. Just don’t close the scanner window and keep hitting scan. Also make sure you leave enough ‘slop’ in the scanner applet’s crop outline to account for differences in height and width from comic to comic. This is especially a concern when your stack includes books from different eras or publishers. Comics are cut a good deal smaller in height and width today than they were in the 80’s…the 70’s were even wider and the 60’s and 50’s wider still.
With scanning completed the first step is to crop the image (and “true” the image if necessary using the Rotate Canvas/Arbitrary command):

Depending on your mouse, the steadiness of your hand and other factors you may have to zoom in a LOT (300%+) in order to crop a very minute amount of pixels off the edges. With my particular setup I generally only need to do that when I get down to one pixel adjustments.
Now for the processing/editing and saving. Start with the Auto Levels command:
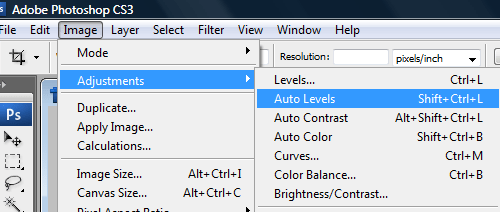
Photoshop’s Auto Levels command basically “punches up” an image. It makes the blacks a little blacker, the colors a little deeper and generally makes photos more life-like. It can correct a lot of common lighting problems but it doesn’t always work. I would say it gets things right about 99 percent of the time. Compare the actual comic to the auto-leveled one and decide for yourself. Note -because it does make whites whiter it can make your comic look a grade or two better than it really is so be careful not to misrepresent your comics when selling online!
Now it’s time to resize:
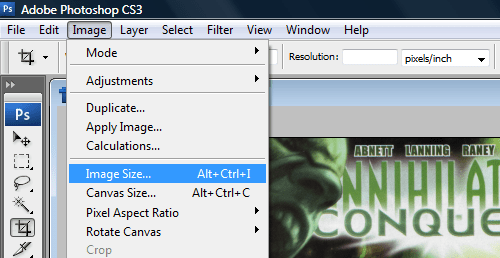
Change the resolution field to 115 pixels. Leave everything else alone:

Why 115 DPI?? 115 DPI will result in an image that is on average (depending upon era and color depth) between 250 and 700 kb in file size and about 1175 pixels in height. I consider the 24 inch wide screen LCD display running 1920×1200 the “holy grail” of PC monitors and that is what I intend my next monitor to be (right now I have a 20 inch running 1680×1050). Since ComicBase will automatically display your cover image and zoom it up to full-size (or the limits of your monitor) this fits my “holy grail” resolution perfectly. Even if you don’t intend to ever have such an extravagant display you may want to save at this size “just in case”. LCDs are getting cheaper and cheaper so one day the 24 inch wide screen won’t be such an extravagance.
After resizing run the Unsharp command:

Amount 50% , Radius 1.0 and threshold 0:

Now it’s time to save your image:

Photoshop saves jpegs using a quality scale of 1-12. I find that 9 gives good compression while still giving sharp clean images. Remember if you compress too much it will look pretty bad especially on text and line-art.
Here is the resulting final image used in this tutorial (click for full size):

You can then use your favorite image viewer or Windows Explorer to drag and drop your scans directly on the issue listing in ComicBase. You should also save copies of all your scans in a separate directory on your hard-drive in case you ever need to reinstall ComicBase or switch computers. See the official ComicBase Scanning Guide for info on file names supported by the program.
I highly recommend recording these steps as a Photoshop Action:

This will automate all of these steps after the cropping is done.
That’s about it. Don’t forget to periodically clean the platen and backup your scans to DVD or an external drive!
NOTE: This page now has a “part two” here:
http://lrpctechblog.com/comic-books/cover-scanning-in-the-retina-age/
